Pages

Search your topic!

Wednesday, 29 August 2012

How to Add a Pop Out Facebook Like Box in Blog or Website?


If you wanna add a Pop-Out Facebook Like Box in your website or blog, first you must have a Facebook Page. If you already have it then it's OK. But if you don't have it, then create a Facebook Page with your FB account. 

Many websites or blogs have a Facebook Like box in their pages. But adding a Facebook Like box may consume valuable space. As a result, many people are no longer willing to add it. Pop Out  Facebook Like Box may be the solution of this problem. 

I'm gonna share a small script with you. By this script you can easily add pop out like box in your site. Just place the below code in the header of your page. I believe this simple code should work for all. 

And if you use this code on blogger then follow the steps below: 
  1. First sign in in your blog and hit on the design button from the top right corner.
  2. Then choose the layout option.
  3. Here you'll find several buttons to add a gadget. 
  4. You can choose anyone it doesn't matter. Click on Add a Gadget.
  5. Now you'll see a list of gadgets. Choose HTML/ JavaScript. 
  6. Then copy and paste the below code in the content box > Save > Save arrangement.
  7. Now visit your blog and see the result. 

<script
   type="text/javascript"
   src="http://www.monkeyphysics.com/fb-sidelike/fb-sidelike.js"
   fbpage='markspcsolution'></script>

NB: Replace the red part of the code with your Facebook page name. 

Customization: You can't directly customize this code.
Because this code is just a script. The original code is located in the server. If you wanna customize this code then you must upload the original code in your own server. You can download the code from the links below: 

1. Code Script
2. Image 1 and Image 2

And if you use your own server then replace the script tag with you own server. 
I mean- src="http://www.monkeyphysics.com/fb-sidelike/fb-sidelike.js"


Stay with Marks PC Solution to get more interesting IT topics!

Sunday, 26 August 2012

How to Add StumbleUpon Button in Website or Blog?


StumbleUpon is a very popular bookmarking site. If you stumble your blog or website or if the reader of your site do it, then definitely you'll get a traffic boost. This site is very helpful to drive traffic on your blog.

But nobody like to stumble your page by copying link from your site and paste it into StumbleUpon.com. And this is not logical too. 

So what should you do? You can place a html code in your page. So that you or someone else can easily stumble your posts. It is as easy as placing a html code. Let's try.

  1. If your blog is powered by blogger then sign in to it. Then go to the design option. Then hit on layout button. Now you'll find several Add a Gadget button. Hit a button where you wanna place the stumble upon button. (If your site is powered by WordPress or any other CMS then follow the steps that let you add the html code on your page.)
  2. Then you'll see a list of gadgets to be placed on your blog. Choose HTML/ Java Script. 
  3. Here you'll find two boxes. One is for name and another is for content. Don't write any name of this gadget. Just copy and paste the below code in the content box. 
  4. Now save this window and then hit on Save Arrangement button. 
  5. Then click on View Blog button and see the result. 
<!-- Place this tag where you want the su badge to render --> 
<su:badge layout="5"></su:badge>  <!-- Place this snippet 
wherever appropriate --><script type="text/javascript">   
(function() {       var li = document.createElement('script'); 
li.type = 'text/javascript'; li.async = true; li.src = window.location.
protocol + '//platform.stumbleupon.com/1/widgets.js'; var s 
= document.getElementsByTagName('script')[0]; s.parentNode.
insertBefore(li, s);   })();   </script>
This code will create a button like below: 

Stay with Marks PC Solution to get more interesting IT topics!

Sunday, 19 August 2012

How Secure is Your Password?


Today I'm gonna share a funny site with you. This site will tell you how secure is your password. The most interesting thing is that it will show how much time is required by a desktop PC to crack your password!

Of course I don't know how much useful it is. But one thing I can assure you is that it will be very interesting. 

Let's try it. Visit this site- http://howsecureismypassword.net/ to start the fun. Under HOW SECURE IS MY PASSWORD? you will find a box to enter your password. When you type it will show a text something like that - 

SHOW SETTINGS
It would take a desktop PC about6 billion yearsto crack your password


Below this text you will find a button named SHOW DETAILS. If you click on it then it will show the details of your password like below: 

SHOW DETAILS

HIDE DETAILS
  • Length: 15 characters
  • Character Combinations: 62
  • Calculations Per Second: 4 billion
  • Possible Combinations: 768 septillion

  • After this details there may come some other information depending on your password. It will give you some recommendations if necessary. And might say whether your password is secured or not. 


Stay with Marks PC Solution to get more interesting IT topics!

How to Add Flag Counter in Blog or Website?


If you've a blog or website then you may need a flag counter to know where do your site's visitors come from? Or how many countries has your blog reached so far? 

Today I'm gonna share a html code with you. This code will show the total page views of your site with total number of countries, unique visitors per country with flag label. All you need to do is just place an html gadget in your page. Or if you're new, then follow the simple steps below: 

  1. If your site is powered by blogger then sign in to your account. Then go to the layout option from the design. Then click on Add a Gadget where you wanna place this flag counter. Or if you're on WordPress or any other CMS system then follow the steps that let you add an HTML code on your site. 
  2. Then select HTML/ JavaScript. 
  3. Now copy and paste the following HTML code in the box and click save. 
  4. Then click on Save Arrangement. 
  5. Now visit your site and see the result. 

<a href="http://s06.flagcounter.com/more/sqB"><img src="http://s06.flagcounter.com/count/sqB/bg_FFFFFF/
txt_000000/border_CCCCCC/
columns_6/maxflags_30/
viewers_Visitor+Counter+by+Flag/
labels_1/pageviews_
1/flags_1/" alt="free counters" border="0" /></a>

Customization: You can customize the above code as below. 
  1. Number of Column: Notice the red colored (columns_6) text of the code. You can use 2, 3, 5 or more. This number determines how many columns will be displayed for showing flag. Maximum 8 columns can be displayed. 
  2. Maximum Flag: Then see the green colored part (maxflags_30). It means what will be the maximum number of flag. You can choose 20, 30, 40 etc. You can choose more than 100. But     I prefer below 30. Because choosing more than 30 flag will increase the loading time of your page.
  3. Flag Label: Now move to the purple colored part (labels_1). Labels_1 means it will show the label after the flag image. For example: US, UK, BD, PK etc. But showing label increase the size of the flag counter. If you wanna hide the label then replace the text as labels_0.  

Stay with Marks PC Solution to get more interesting IT topics!

Tuesday, 14 August 2012

Cut or Convert Audio & Video Files Using VLC !!


Well, actually this is not very surprising if you're already familiar with this technique. To be honest, I didn't know about it few days ago. 

In fact, the conversion and cutting option of VLC is almost hidden. So I can't blame myself as I didn't know about it. Only a few days ago I'd come to know about the process. 

In this post I'm gonna show you how to cut or convert a video or audio files using VLC Media Player.

To cut a video or audio follow the steps below: 
1. Play the audio or video file you wanna convert.
2. Then go to the View menu and choose Advanced Controls.
3. Now you'll find some additional controls at the bottom of the player. 


4. Here is a round red button. This button can be used to record the audio or video file.


5. Click on this Record button to start the record and click again to stop the recording.
6. Now find the recorded file in the User > My Videos or Music. If you're running 
    Windows 7 or 8 then go to the Libraries > Videos or Music.


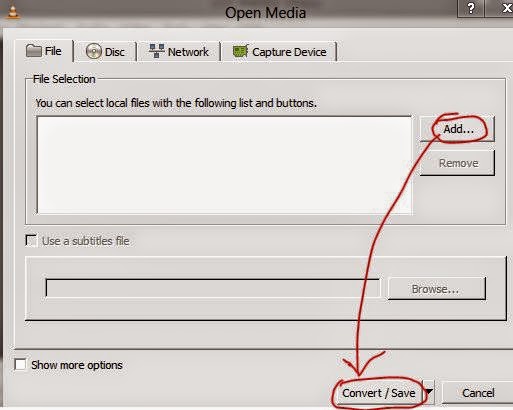
If you directly wanna convert a file then follow these steps: 
1. Open VLC Media Player.
2. Then click on the Media Menu and Choose Convert/ or Save. 
3. Now click on the Add button to choose your desired audio or video.


4. Then choose a location for the output file and give a name from the destination.


5. Now select the output format from the profile option and click on Start button. 


Stay with Marks PC Solution to get more interesting IT topics!

Saturday, 11 August 2012

How to Create a Custom Toolbar for Website

A customized toolbar of your blog or website may increase visitors loyalty. If they found your toolbar useful they can use it in browser. And this is also important for your site's ranking. There may be hundred ways to build a toolbar. Some of them are free or some may be premium. 

For creating toolbar, my personal choice is Alexa. Why? 
  • Because it's free and easy to use. 
  • You can easily monitor the usage statistics. 
  • And most importantly, alexa is a ranking site. It measures websites ranking from 1 to the last. 
  • Alexa considers the site most that has its toolbar and widget in the page. 
Let's build a toolbar now. 

1.  First go to the Alexa and register an account. It takes 2 or 3 minutes. If you already have 
     an account then proceed to the next step. 
2.  Now go to the toolbar creator page.
3.  A pop up window will ask you to enter the toolbar name. Type the name or skip it. 
     You can write a name later.


4.  Now look at the image below. Here you can edit toolbar name and choose a logo. 


5.  Have a look at the Add buttons that drive traffic to your website. There are 4 buttons.  
     Only add the buttons that is necessary for you. Because you can't add 
     all the buttons due to the space limitations. 
6.  Now move to the Add social networking buttons section. Add only the first 2 buttons. 
     Show tweets button is not necessary. Click Next. 
7.  Add buttons for things that your users do everyday. This is the most useful part for 
     the users. I recommend you to add the Personal Twitter and Gmail button. Click Next.
8.  This step let you add an icon for the toolbar. You can either choose an icon made earlier 
     or use the default. I prefer to use the custom image. Click Next.


You're almost done. Publish it to make the toolbar available for download. But how can your visitors will get it? 

Go to the dashboard and click on your toolbar. Then you'll find different shapes and colors. Choose the color and shape as your choice from step 1 and 2. Then add a HTML gadget in your blog by the html code from the step 3. Place the gadget in a part of the page where the visitor can easily find it.


Currently the alexa toolbar works with Chrome, Firefox and IE. Hope it will support more browsers in the future. 

Have a look at the sample toolbar below: 

Click to enlarge
If you have any query regarding toolbar creator then leave a comment. 


Stay with Marks PC Solution to get more interesting IT topics!

How to Create Password Reset Disk?


For your computer security you can set start up password. Whenever you turn on PC, Windows ask you to enter password. Then you enter password and get access to the desktop. And all of us know that it is a normal process. 

But, if your forget your password? Then what? 

You might think experts can easily break it and have access to the PC! And as you're not expert so enter the DVD in the drive and start installing Windows again. And you lose all of your files and folders that is stored on installation drive. 

But you can avoid such type of hazard very easily. I don't advise you to write down your pass in the diary or calender. Because this is not safe. Just spend few minutes to create a password reset disk. It's safe and easy. And there is no risk. Follow the steps below: 
  1. First make sure you've connected your USB Flash Drive in the port. You don't need to format the disk. And your files will not be affected. 
  2. Then go to the User Accounts from Control Panel.
  3. Now hit on the Create a password reset disk option from the left panel.
  4. You'll see Forgotten Password Wizard. Click Next.
  5. Select the drive that is to be used as reset disk. Click Next.
  6. Enter the current password if any. Otherwise leave it blank. 
  7. Click next and wait for the processing. Click Next again. Then Finish.
The disk is ready for use. Now open your USB drive and look for a 2 KB file named userkey.psw. This is the file that can help you to reset the password. Don't delete it. 


Now restart your PC and try to access by entering a wrong password. You'll see the Reset Password option. Click on it and type a new password. And from now you can use this password. 

You can change your password as many time as you wish by the same disk. 

Click to enlarge image

Caution: Anyone can change your password if he knows about your reset disk. So make sure that unauthorized person is not familiar with your reset disk. 

NB: This system has been tested on Windows 7 and 8. And it will work only on that PC from where the disk is created.  

Fun Fact: You've to create this disk before forgetting password. After forgetting this password, you can't create this disk. 


Stay with Marks PC Solution to get more interesting IT topics!

Wednesday, 8 August 2012

Boost your Traffic with Link Collider


In this post I'm gonna share a site with you. This site will help you to boost your blog or website visitors. And at the same time it will also increase your site's Google +1, FB Like, Twitter Follower etc. 

And I can assure that, you'll not feel any harassment while using this site. Simply register and follow my instruction. 
  1. First visit this site. Link Collider
  2. Then register by your contact email and enter a password and confirm it. Now submit it.
  3. Now go to your mail inbox to confirm the registration. NB: Also check your spam box.
  4. Now it's time to add your website or page.Click on Post a Website / Facebook Page.
  5. Now fill up the form properly. You should choose an attractive logo with an ideal description of the site. Then save it.  
  6. Look at the Collect FREE Tokens button next to Post a Website / Facebook Page. There are 8 categories- Like, Tweet, Share, Follow, Auto etc. 
  7. Collect tokens by these categories. You must have Google Plus, Facebook, Twitter and YouTube Account to perform these tasks. And make sure you're signed in all of these accounts in the same browser while doing these. 
  8. You can monitor your sites by clicking on My Websites button.
Caution: These types of link building and SEO sites are the targets of hackers! So I recommend you to use your alternative Email ID other than your primary ID. And you should use a different password other than your Email account password. 

NB: You've to regularly visit this site and collect tokens to increase your traffic. 


Stay with Marks PC Solution to get more interesting IT topics!

Thursday, 2 August 2012

Play Guitar with Google Doodle!

Have you ever played guitar? To be honest with all of you, I never played it. And I am not interested to do so. Because I am busy with my computer, internet and blog. 

But I often like to play digital guitar! If you frequently visit Google then you may notice that its logo changes time to time. At present it shows Olympic events as doodle. Sometime in 2011, I opened the home page of Google. I surprised at looking its doodle as below. Whenever I move my cursor it sounds just like a guitar. 


Click this link to play guitar


This doodle was launched in honor of musician and electric guitar pioneer Les Paul, who passed away in 2009. You can play this guitar by mouse and keyboard. Just move your mouse over the doodle and it will make sound. You can also play it by pressing the keys of keyboard.

Recording option is also available for you. You can record your performance and get it by a link. 


Stay with Marks PC Solution to get more interesting IT topics!

Wednesday, 1 August 2012

How to Backup or Restore Blogger Template?

Blogger let you backup your whole blog template. Keeping a backup copy of the template is specially necessary for new bloggers. If you're a new user you may customize your blog by taking helps from others. But if you make any mistake you may lose your customized blog template. In that case you have nothing to do other than restoring the default template. 

However if you keep a backup copy of your blog template then you can use it in other blogs too! Even you can share the same template with your friends. Besides if you make significant changes of your template and get it back in a previous stage then you must have a backup copy. 

To backup or restore your blogger template follow the steps below: 
  1. First make sure you're signed in on your blogger account.
  2. Then go to design.
  3. Now click on the Template button from the left panel. 
  4. Then click on Backup/ Restore button from the top right corner of the screen.
  5. To download the template, hit on Download Full Template button. And if you wanna restore template then choose previously saved template file. 
The following picture may be useful for you. 


Stay with Marks PC Solution to get more interesting IT topics!

Saturday, 28 July 2012

Google Scientific Calculator!


Previously I posted about Google Calculator. In that system you are supposed to type your calculation in the Google search box and press enter. The result shows immediately after pressing enter. 

But now it is much easier to use Google as Scientific Calculator. In fact, it is a new sign of innovation by Google. Now you'll get a whole calculator in the home page of Google. And you can calculate just by mouse click. Keyboard is not necessary! 

To perform your basic or scientific calculation you just need to visit Google. Then type calculator and press enter. You can also visit this page to get the calculator directly. Now you'll see a calculator like below. 


Now give input by mouse click and press the equal button and have fun! 


Stay with Marks PC Solution to get more interesting IT topics!

Friday, 27 July 2012

How to Backup or Restore Blogger Blog?

If you're blogger then you may need to backup your entire blog. If you lose your password or if your account is hacked then you can restore your whole blog in a new account. Or you can export your whole blog if you've a back up copy of your blog. 

To back up your blog, follow the steps below: 
  1. First, make sure you're using the new interface of blogger.
  2. Now go to the Settings option and choose Other.
  3. Hit on Export blog from Blog tools.
  4. Then click download blog.
  5. Now your whole blog will be saved as .xml file.


To restore or import your blog, follow the steps below: 
  1. Go to the Settings option from blogger and choose Other.
  2. Now hit on Import blog.
  3. A window will let you choose the .xml file. 
  4. Now choose the .xml file that you previously download from your blog. 

Stay with Marks PC Solution to get more interesting IT topics!

How to Install Microsoft Security Essentials on Windows XP?


Microsoft Security Essentials is the most reliable antivirus ever made. In fact it is a great step by Microsoft Corporation to provide an antivirus to the Windows users at free of cost. Though it is very harmful for the third party security companies. 

Windows 7 users can easily install MSE on their computers. But if you're using Windows XP then you may face problem installing it on your system. To install MSE on Windows XP SP 2 you need some additional files. 

To install MSE on XP SP 2 download the file below. Then install all the three files of the folder. Then install MSE. If your XP is service pack 3 then install only the first file. 


If you use Windows 8 then you don't need any third party security software. Because it has built in security system

To know more about Microsoft Security Essentials click here


Stay with Marks PC Solution to get more interesting IT topics!

Play all kinds of Audio and Video Files!


Almost all of you sometimes face problem with playing audio or video files. Specially video files  with extension like .mkv  may bother you. Today I am gonna show you the way to avoid such kind of problems. 

This problem occurs when you have no sufficient codec pack installed on your PC. Windows Media Player can't play some files if codec is not installed. In that case you can use media player like VLC, KMPlayer etc. But this is not the real solution actually. Because sometimes VLC may fail to play all the files. 

You can choose any of the following method to avoid problems regarding any type of media files. 

Method 1: Use Splayer as your default media player. It can play any type audio or video files. It is very fast, light and simple. Download link

Method 2: Use K-Lite Codec Pack. It will work as codec as well as media player. If it is installed on your system, then Windows Media Player can also play any type of media file. Download link

Method 3: Use Windows 7 Codecs if you're using Windows 7. If it is installed on your system then any media player including WMP, VLC, KMP can play almost all types of video files. Download link.

My personal choice is Splayer 


Stay with Marks PC Solution to get more interesting IT topics!

Wednesday, 18 July 2012

Submit Your Website or Blog in Search Engines for Free


Web developer or blogger already know that it is not a very easy task to drive traffic from search engines. It takes huge time to perform SEO activities for a site. Forum posting, article writing, social connection, back linking, keyword selection and so many tasks need to be performed for SEO. 

But the most important task is to submit your site in the search engines. The most popular search engines are Google, Yahoo, Bing etc. Besides there are thousands of small search engines available in the web. 

But the submission is a very time consuming task. Specially when you need to submit your site to the search engines one by one. And this is very critical too. For your convenience there are also some sites that make your task easy. All you need to do is just submit your website or blog to those sites and they will automatically submit your site to the search engines. 
  1. Diggza
  2. Free Web Submission
  3. SEO Scores
  4. Add URL Free
  5. Add Me
  6. Submit Express
All of the above sites will submit your web or blog to the search engines for free. The procedure differ slightly. But the basic procedure is same. 
  • You've to submit your site's URL and your Email ID.
  • Then agree with their terms and conditions.
  • Check your Email and confirm submission if asked.
  • And resubmit your site once in a month. 
Tips: 
  • You don't need to submit your site in all of the above sites. Choose one or two of them that is suitable for you. 
  • Use an alternative Email instead of your primary Email. Because you may receive many unnecessary messages from those sites.
  • Don't submit your sites very often. 
  • Only submit your home page URL (eg. www.munnamark.blogspot.com). 


Stay with Marks PC Solution to get more interesting IT topics!

Add a Moving Text Bar on Your Blog

Visit Marks PC Solution to get more interesting PC and Internet Tips

Today I will give you a code that is really really useful for bloggers. You have already noticed that this post has been started with a moving text. And from this post you'll learn how to add this on your blog. 

Before starting I wanna say you, this bar can be used as news headline or notice bar. Or you can use this for any purpose. It's simply an html code that can be place anywhere of your blog. If you place it at the top then it can be used as news bar. You can also put it on the side or bottom of your blog. But make sure you're customizing the size and using the bar properly with the place where you wanna insert it. 

Let's start. (Make sure you're using new interface of blogger)
  1. First, go to the design option from your blogger page. 
  2. Then hit on Layout option from the left panel.
  3. Now click on Add a Gadget from any part of your layout. I prefer top.
  4. Now scroll down and choose Html/Java Script then copy and paste the code below.
  5. You're done. Save the code and refresh your blog page. 
<!-- This Script is from munnamark.blogspot.com, Coded by:  Md. Abdur Rahaman--> <div align="center"><font color="#ffffff" size="+1"><marquee bgcolor="#000080"direction="left"loop="20" width="100%"><strong>Visit Marks PC Solution to get more interesting Computer and Internet Tips </strong></marquee></font color="#ffffff"></div> <font face="Arial"><a target="_blank" href="http://www.munnamark.blogspot.com/"><span style="font-size: 7pt; text-decoration: none">Visit Marks PC Solution for Computer and Internet Tips</span></a></font>

You can customize the code as below :
 
  • Replace the red text of the code with your text. 
  • loop is 20. You can choose more or less than 20. It means your text will be shown 20 times.
  • div align center. You can use right or left.  
  • Direction is left. You can use right. 
  • Width is 100%. You can use 40, 50 or 70% too.  


Stay with Marks PC Solution to get more interesting IT topics!

Free counters!